
rasputin
-
Posts
1,167 -
Joined
-
Last visited
-
Days Won
8
Content Type
Profiles
Blogs
Forums
Gallery
Pipeline Tools
3D Wiki
Plugin List
Store
Downloads
Everything posted by rasputin
-
I'll prolly go in and tweak some edges to make that cushion look separate... usually with a finished VB model, I'll run it through the Polygon Reduction process.... You're right, some of the smooth perfection is lost that way, but not too much of a problem if the model is not sharply focal in a complex scene...
-
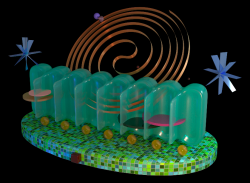
Here's a 1950's Moderne-type sofa chassis I designed this afternoon. It was all done using the R20 Volume Builder. Basically a thick Torus primitive with various chunky shapes Subtracted from it. A shape like this would've been a nightmare to model using just the old tools, I think you'll agree. But it was not too hard to do with Volumes. I'm lovin' the buttery-smooth shapes you can make with the VB. I'll have the rest of this room scene built in the next couple of days and will show it to you when I do. ---ras
-
From the album: Rasputin Gallery II
Corona 3 Render, 76 passes. -
 Абсолютно красивый во всех отношениях, Евгений. Изысканные, маслянистые цвета и освещение. Масло-желтый на стульях и нежный зеленый цвет пианино-бархата являются изысканными. Вы даже пропитали стулья нежной парчой. Браво.
 -
From the album: Rasputin Gallery II
Corona 3 render: 23 passes -

From the album: Rasputin Gallery II
This scene, rendered with Corona 3, 100 passes. Here I am experimenting with pre-made photogrammetric objects... ie., the building, car and woman were realized from real-life using photogrammetry. The scene setup and lighting, though, are mine. -
 Thanks so much, VH!
 -
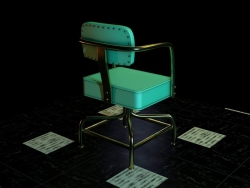
From the album: Rasputin Gallery II
All objects modeled by hand in C4D (except for the chair and foliage). Corona 3 Render, 100 passes. -
From the album: Rasputin Gallery II
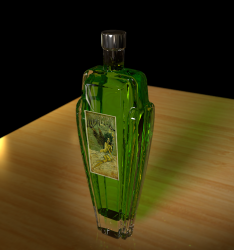
I am loving R20's new Voxel Building function... It's great for things like glass. I built up this bottle using Voxels. -
You bet, Sage!
-
Hey, VST, I have encountered much the same thing when working with volumes: sometimes my computer would be made very slow indeed by a subtraction or union. And my machine is fairly powerful, too. I found that the problem was greatly alleviated if I: made sure that the primitives or mesh objects I dropped into the Volume Builder did not already have an extremely high polycount. For example, I have my sphere primitive bumped editable with a Segment Count of 60, rather than the usual 90--100 I usually prefer. With your Cubes, make them Editable with a polycount setting of 8---8---8. The trick is to make your Volume Smoothing do all the smoothing work, rather than putting high-poly objects initially into your Volume Builder. switched the viewport's current Display Shading away from Gouraud and down to Hidden Lines mode, at least while I am doing the object translation needed for a Subtraction or Union; you can even leave your scene in Gouraud, and instead apply a custom Display Tag to your Volume Mesher to temporarily reduce the demands it's making on your computer resources. and of course, as you know, the whole Volume operation is made more CPU/RAM intensive if your Voxel Count is dialed very low, or your Smoothing Iterations is too high. One trick is to perform your Union or Subtraction while the Voxel Count is set to something loose, like, say, 5cm. Then, after you've gotten everything the way you want it, dial the Voxel Count down to something finer, like 1 cm. And, as you know, the Meshes you get as a final result of Volume Building are invariably crazy-high in polygon count. I almost always then apply a Polygon Reduction to that mesh; you can reduce your polycount up to 75% or more, with no discernible loss in visual quality. All in the name of safeguarding your computer's resources and preventing a huge hang or crash. And, vis-a-vis your texturing your objects: Bear in mind that, once you drop a mesh (or other object) into the Volume Builder, it ceases to be a "mesh". It has become a voxel volume, (a whole 'nother thang) and, as such, will not take a Texture. Only the Volume Mesher (in your OM) can receive a texture. And that Texture will apply to the whole stack of objects in the Volume Builder. Somewhere online, there is a tutorial of how you can use the Correction Deformer on the Volume Mesher to enable you to assign different textures to the different objects placed under the Volume Builder. Though usually your goal is to create a whole new mesh with a single texture, as the goal of Volume Building is not so much to allow you to to do Boolean-type operations, but rather to yield brand-new objects which possess the unique "edge-smoothing" look that Volumes afford. Best, ras
-
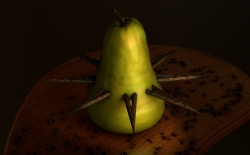
Here's my current WIP: a human skull. This was done entirely using the SCULPT feature in R20. I started out by using Volume Building, where I united a Cube and 2 Sphere primitives, to create my basic "chunky block", roughly in a skull shape... Then the rest was all done with Sculpt, looking at photographs. As you can see, because we're not working with voxels, there eventually occurs some nasty "bunching and stretching" of the polys. Increasing the Sculpt fineness/density does not really alleviate the artifacts, sadly; nor does using the Smooth feature. Maybe future releases of C4D will feature true voxel sculpting... What it needs, of course, is a Retopo, and I don't really understand how to achieve that in C4D. I never did figure out how to use the Polygon Pen to effect a Retopo. The skull isn't done-- I still need to etch in those teeth! Organic forms like this are jolly hard to sculpt. ras
-

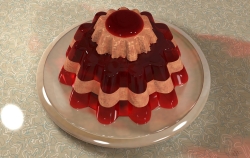
From the album: Rasputin Gallery II
My old friend Dean had a birthday in South Africa today. So I made him this little "birthday card". -
From the album: Rasputin Gallery II
R19, Corona Render, 64 passes. About 35min. -
From the album: Rasputin Gallery II
R19 Corona Render, 46 passes. -
From the album: Rasputin Gallery II
Modeled this myself in R19. -
From the album: Rasputin Gallery II
R19. -
From the album: Rasputin Gallery II
Modeled in R19, Corona Render, 64 passes. -
From the album: Rasputin Gallery II
R19, Physical render, 64 passes. -
From the album: Rasputin Gallery II
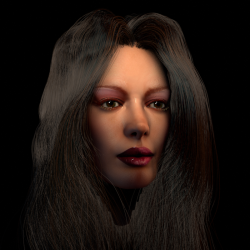
My latest attempt at doing a 3D head in C4D. November 2018. The head mesh was modeled and morphed in POSER 8, but all the rest was done natively in C4D R20. Physical render, 46 passes. About 30min render time. Physical Render can now anti-alias Hair properly, I see. -
Hey guys, I don't know if you've encountered this problem when seeking to share your C4D renders on Facebook: Facebook's image publishing algorithm features a rather harsh compression standard. (I guess they have to use it, given the bazillions of images they are forced to store on their servers everyday.) In most images you publish, Facebook is going to make them come out with nasty artifacting, especially all sorts of ugliness around your sharp edges. It also tends to make your fields of solid color full of bad artifacting, and will make your color gradients come out with ugly banding. The more "toon-y" and less photorealistic is your image, the worse will be the artifacting. I've had a couple of my image posts almost completely ruined by Facebook's compression, which bummed me out plenty. Even if your render is already compressed and low-filesize--- as with a JPG--- Facebook will even compress it further. Well, I think I've discovered a bit of a workaround to making your image posts to Facebook look better, a bit closer to how they originally looked when you first rendered them in C4D. Export your C4D render as a 16-bit PNG. Import your C4D render into Photoshop, then choose the ADD NOISE filter. Make sure the filter is set to Gaussian and Monochrome. Then you want to dial in a Noise setting that is extremely subtle, like 0.5% or 0.6% The resulting noise should be extremely subtle, and not change your C4D picture unduly. You can always FADE the effect under EDIT after application, until the noise is almost imperceptible. I don't know why--- someone clever here will perhaps know--- but the slight noise added to the image completely "short-circuits" Facebook's compression algorithm, and your image will be posted with very little... almost no... banding and artifacting (which were far worse, visually, than the slight Noise you're adding) I also notice that Facebook tends to post your image slightly cooler and slightly less saturated than it appeared when first rendered. You can prep for this by making your image 2-3 degrees warmer in Photoshop under HUE/SATURATION, and you can use 2-3 degrees of Vibrance added, before you post to Facebook. With these steps-- admittedly, they are a workaround, not a cure--- your image in Facebook should look closer to your original artistic vision. ras
-
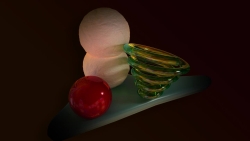
From the album: Rasputin Gallery II
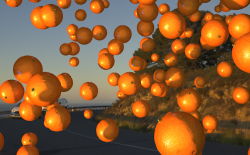
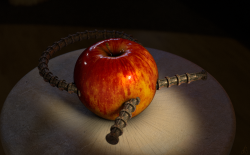
Physical render, 46 passes. Here, my goals were to see if I could: paint my own orange-peel material in Photoshop, just to see if I could manually recreate the look, instead of sourcing a real photograph match the 3D objects as closely as possible to the existing light of this HDRI for a convincing composite use EMBREE SMALLER, just to see what it does use Volume Mesh to create that little "navel" object on the orange play around with different anti-aliasing filter settings to gauge the effect... finally settled on 2+2 use three layers of Reflectance in order to best simulate a naturalistic falloff on the orange (as a sphere) -
From the album: Rasputin Gallery II
A study in contrast of textures. (Oct. 10, 2018) Physical Render, 50 passes. -
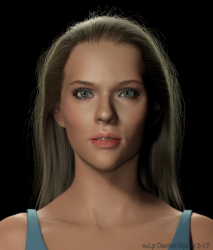 Excellent work, Dan! You did the right thing of making her sclera (eye whites) not too white. That is the #1 thing that 3D portraitists get wrong. And you didn't go overboard with the SSS... quite correct.
 -
Hey guys, I have been trying to learn the new R20 Node Material system... just by diving in. Here is a "dummy" scene I've created, with an abstract object, that doesn't mean anything, modeled from Volumes. I just understand the very basic concepts of Nodal materials... but I hope to eventually understand the more mathematical aspects of it. My biggest hope with Nodes is that I'll be able to start creating Materials, made with bitmaps, where the texture repeats absolutely don't show at all. Any tricks you know in this department? Best, ras