Rectro
-
Posts
3,798 -
Joined
-
Days Won
102
Content Type
Profiles
Blogs
Forums
Gallery
Pipeline Tools
3D Wiki
Plugin List
Store
Downloads
Everything posted by Rectro
-
Yea, its my first project modelling in C4D, so am glad I got through the trials and tribulations, workarounds for future projects. This challenge gave me reason and purpose to take on C4D methods. Your right, I think an environment would take the attention away, maybe a back drop colour gradient of some kind, or objects in background blurred out. Dan
-
My character its coming along great thanks. I didnt spend much time yesterday on it, just toying with cartoonizing him, make him look a bit more compelling, think I have found the look now. Monday will start making clothing, accessories which will be fun, then do the Uv work. Still plenty to do, but got the core asset made now. Looks like your at the stage of fine tuing his overall look now, very rewarding stage to be in when a slight change can make all the difference. Dan
-
Your right about the image compression, thats why I never use the forums own uploader if im showing any work, I use http://imgur.com/, and copy the embed link directly into the post, works a treat. Dan
-
Il find the Infinite realities file, and give you that later on, your see how iv set that up. The different colour maps depending on what SSS method you use willl have different outcome according to the overall skin tone. Referring to the Fast SSS2 which is a simple set up, the overal colour bears the most importance, the other two layers dont override this overall colour which is your standard pink skin colour map. The other two layers are for the colour of the SSS effect and hardly change the colour tone, where as the Skin material is totaly different. The Skin materials layers are all fighting againts each other and you have to fine tune the amount, and radius/depth of each layer, and the only way to do that is with alpha control maps. The case of the Skin material it takes ages to get something half decent, where as the Fast SSS2 not even close to the same time. The diffuse colour stops light penetrating so yes it holds back the SSS effect which can be nice to give a bit of contrast back. To note if your model is not real world scale, you should use the scale parameter, not try to adjust all the other settings as your have a battle on your hands. Skin as you know is not easy to set up as there are too many factors to take into account, its a ballancing act, but that can be easier if you eliminate some things right at the beginning which is proper lighting, proper scale, high quality model, and very high quality maps. Use the Vray Powershader or advbitmap loader to your texture maps into, this let you tweak the values. If Vray had a reliable IPR for skin, then it would make the world of difference getting instant feedback. Dan
-
As of yet of yet I havent used C4D for that kind of sculpting, I use default brush in Zbrush, and a alpha that has slight blurred spots with a spray stroke, Im not sure C4D has the ability to use a alpha and a spray type nozzle? For the ultimate best skin detail it should come from the colour maps but bringing it into photoshop and using methods to enhance, and bring the details out saved into a bump map. For creases, again Zbrush has some ideal brushes that cut and pinch at the same time. Dan
-
3k render looks awesome mate. Dan
-
Sorry, I thought you had seen it, I didnt leave it up as it dont represent the same standard of my other videos. Its live again to watch. Dan
-
Thanks mate, its coming along now. Im glad I did this as this is my first ever modelling session in C4D, cant learn a app faster than getting stuck into a project. Thanks, Dan
-
Hi. Its no bother at all, im glad to help. Bump maps are for high details, so you can use a displacement map if it contains the high details, as they are both grey scale maps. To map the maps your best off to sculpt the detail, this can be done in C4D then bake a displacement map, use that in the bump channel. If your using vray 3.x beta, make sure you plut all maps into the AdvBitmap vray loader. If you dont want to sculpt the details then you can use a procedural noise, but your need to bake that into a map. I use normal maps for high end detail, and bump for secondary information on top if im not using a 32 displacement map. Now days I just use a 8k 32bit displacement map and dont bother with neither bump or normal maps. Zbrush is my tool for sculpting details, and producing maps. Dan
-
Day 5: Hands and Feet So today was hands and feet, this completes the modelling of the boy. Now its time to do some sculpting, as of yet non has been done to get the final look im after. Next is hair, accessories. Cant wait to Uv map and texture him, thats when I will finaly get his look.
-
Yea its not very fast in C4D for retopo, also a bit sensitive at times, is there a tollerence setting for the polygon pen in C4D, that would help? I use MODO for retopo work, and keep it very low poly then apply 1 sub d level saves a huge amount of time. I hope too MAXON develops a dedicated retopology tool that works like MODO or better. Dan
-
Cool work, he is coming on realy well. What software did you use to do the retopology o the head? Dan
-
For character work Studio is the next best thing to Maya, it really does have a nice set of additions to Studio that make it very complete package, for me I had to have Studio as the Hair modual is the best hair system iv ever used, and the Character rigging tool is very fast to rig. Only down side to Studio is the upkeep as upgrades are rather expensive, but there is always the rent option. Dan
-
Hi. Glad you like it so far. The hair is generated from the Hair modual. In the hair settings you select Generate Triangles, and adjust the thickness within the hair material. Your need to bring the number of hairs down significantly, in the above trial it was about 100 hairs. The good thing is you can style the hair as normal using the hair tools while the geometry follows it. When your done, you can select the hair object, right click and choose Current state to object, now you have geometry hair. Dan
-
Thanks guys, appreciate your feedback and support. Im trying out some ideas on hair, not sure if I should go scruffy, or draped.
-
Day 4: This morning did the body, fitted the head. Will go back in later and add additional details such as belly button and ribs using edge loops in the right places. I dont intend to use any displacement maps so am pushing the modelling for topology to hold the forms. For the body I wanted to make sure the chest (Pectoralis Major), shoulders (Deltoids), and shoulder blade (Scapular) and a loop to hold these forms. Extra loops for knees, and elbows, although by the time I finish il more than likly refine alot. For now im fitting in 1.5 hour sessions per day.
-
Last screen shots for tonight. I done a quick deformation test to see if I need any more edge loops, and and very happy with the topology for this head.
-
Thanks. At the moment iv got to get through the head and hair, then do some deformation tests for the mouth and eyes, then onto the body. Realy this part is the hardest, and the longest process depending on how far you want to go that is. Being this is my first modelling session ever in C4D im proper learning its strengths and weaknesses. Im going to keep the face and body textures simple for a basic cartoon look, but will put some detail into the accessories and weapons. The plan is to rig him, pose him in a warrior pose standing on a turf stand with rocks, grass around him. of course all of these plans depends on the time factor. By this Saturday I hope to have his full body modelled and head welded on. Dan
-
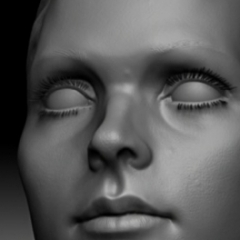
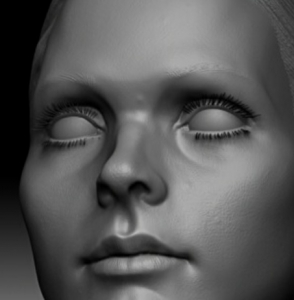
Day 3: Make eyes from two shells, the outer has no polls, and will use a transparency map to show the disk on the inside which is the Iris. The Teeth proved to be the longest session so far as I constantly ran into issues with C4D tools. I finished off today with getting the inner mouth covering the gums of the teeth. I would have not bothered with teeth if it where not the fact that a warrior snarl will show them.
-
Your welcome, glad it helps. I picked that up from Sabin Howard when I was on a course by him called Power and Grace, the Structure of Man. I will go and check his very words again, but he was saying that the side profile contains information that shows depth such as the distance between the nose, eyes, mouth, fantastic artist. Dan
-
Quick update, showing with a shader on, and pushing the cage mesh a little harder to retain shape.
-
Thanks for your comments. I wouldn't say im a expert on Anatomy, but im learning a bit more everyday, its like the Pandora's box, or a hall of mirrors, there is no end, and the more you know, the more you realise how much you dont know. Its hard to answer your question fully, because there is so much I could point out on this, but the foundations are so important, and in this case the skull its the foundation. First the proportions must be right that being the height from chin to peek of skill and orbital bone of the nose to the back of skull which should be 7/8ths of the height. I covered this in my learning session so check that out. The 3/4 view gives alot away, as this profile will show the silhouette of the Brow bone, cheek bone, muzzle area, and chin. The likeness most comes from the side profile, if you get that right your onto a good start. This project is way out of my style of modelling, so its a nice change. Iv only done very basic forms at the moment, there is plenty to do, and I know what it is I need to tweak to get the balance between cartoon, and breaking anatomy too much. At the moment its just getting the concept features into the head with good topology, then its tweak, tweak and tweak some more. Dan
-
Day 2: Worked for just over a hour on Ears, Nose Mouth, Eye sockets. Being that the theme is cartoon I could spare myself realistic anatomy for ears which was nice. Im putting as much into the modelling as possible so it holds all its own forms without the need for displacement maps. Crits, comments welcome.
-
Any updates? look forward to seeing more. Dan